Cocos Creator
Run Demo
- From GitHub Clone or from[Official website product page](../../product/index#CocosCreator SDK) Download the example of FairyGUI-cocoscreator directly.
- The SDK is based on Cocos Creator 2.x version, 1.x version is not supported, so please use Creator version 2.0 or above, 2.0.7 or above is recommended.
- Use Cocos Creator to open the downloaded example project.
- You can see the effect by running directly.
- The UI interface project is in the UIProject directory. You need to use the FairyGUI editor to open it for viewing and modification. This part of the file is independent of the Creator and does not need to be placed in the Creator's assets directory.
- The examples are written using TS, but the core library is fairygui.js, so there is no problem developing with JS.
- fairygui.js is uncompressed, cocos will compress itself when released, and the final size will be around 300K.
Load UI package
FairyGUI organizes the UI interface by package. A UI package may include one or more interfaces. After each UI package is released, it will get a description file with a suffix of bin file, and one or more images as the texture set. These files need to be placed in the resources directory for dynamic loading. Because in order to avoid complex dependencies, management difficulties will be brought about in the future. Our interface is not directly referenced by things in the scene. A UI package can be loaded and unloaded at any time.
Publish the package directly to Creator's assets / resources directory or its subdirectory in FairyGUI editor.
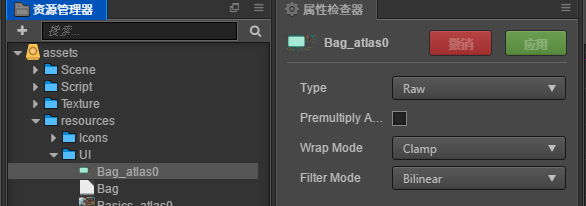
Note that the image can be set to RAW format, and does not need to be set to Sprite. Because FairyGUI will analyze Sprite by itself.
There are two ways to load packages in code. One is to load the file, and the other is to let FairyGUI load it by itself. The first way is to make it easier for you to do an overall load mixed with other resources, or to display the needs of progress.
The first way:
// Filled here is relative to the path in resources
    let res = [
        "UI/Bag", // Description file
        "UI/Bag_atlas0" // Texture set
    ];
    cc.loader.loadResArray (res, function (err, assets) {
        // Call addPackage after both are loaded
        fgui.UIPackage.addPackage ("UI/Bag");

        // You can start creating the interface in the package below.
    });
The second way:
// Filled here is relative to the path in resources
    fgui.UIPackage.loadPackage ("UI/Bag", function (err) {
        // You don't need to call addPackage here, you can start creating the interface directly.
    });
Uninstall UI pack
When a package is no longer used, it can be uninstalled.
// Here you can use the package id, package name, and package path.
    fgui.UIPackage.removePackage ("Bag");
After the package is uninstalled, all the resources such as textures contained in the package will be uninstalled, and the components created in the package will not display properly (although no error will be reported), so these components should (or have been) destroyed. Frequent loading and unloading of packages is generally not recommended, because each loading and unloading must consume CPU time (meaning power consumption) and generate a lot of GC. The memory occupied by the UI system can be accurately estimated. You can set which packages are resident in memory according to the frequency of use of the packages (as much as possible is recommended).
Create GRoot
Every scene needs to have a GRoot, which is the root node of the UI. After the scene loads, you need to manually create a GRoot.
fgui.GRoot.create ();
Create UI
let view: fgui.GComponent = fgui.UIPackage.createObject ("package name", "component name"). asCom;

    // The following methods can display the view:

    // 1, directly added to GRoot and displayed
    fgui.GRoot.inst.addChild (view);

    // 2, use window display
    aWindow.contentPane = view;
    aWindow.show ();

    // 3, add to other components
    aComponnent.addChild (view);
If the content of the interface is too much, it may cause a freeze when creating. FairyGUI provides a way to create the UI asynchronously. In the asynchronous creation mode, the CPU resources consumed by each frame will be controlled, but the creation time will be slightly longer than the synchronous creation. E.g:
    let handler = new AsyncOperation();
    handler.createObject("包名","组件名", myCreateObjectCallback);

    void myCreateObjectCallback(obj:fgui.Gobject)
    {
    }
The interface is usually closed by hiding, that is:
// If it is added to GRoot or other parent nodes
    view.removeFromParent ();

    // if it is a window
    view.hide ();
If the interface is no longer used, you can destroy it:
view.Dispose ();
When the scene changes, all interfaces will be destroyed. If you do not want to be destroyed, you need to set the root node to be resident after creating the interface, and be sure to close the interface before switching scenes.
cc.game.addPersistNode(view.node);
coordinate system
The x / y / position values in GObject are allLocal coordinates, Which is the offset from the parent component. GObject does not provide direct properties to obtain the global coordinates of the object, but provides methods to convert.
If you want to get the coordinates of any UI element on the screen, you can use:
let screenPos:cc.Vec2 = aObject.localToGlobal(cc.Vec2.ZERO);
(Note that the screen mentioned here refers to the screen in FairyGUI semantics, with the upper left corner of the screen as the origin, not the screen in Creator semantics)
Conversely, if you want to get the local coordinates of the screen coordinates on the UI element, you can use:
let localPos:cc.Vec2 = aObject.globalToLocal(screenPos);
Event system
FairyGUI uses Creator's event system directly, so GObject.on / off is actually implemented through GObject.node.on / off, that is, any event operation can be performed through GObject.node, including custom events. In the event callback, the currentTarget in cc.Event reflects which node this event was dispatched. If you want to get which GObject this node corresponds to, you can use this method:
aObject.on(someEventName, this.onHandle, this);

    onHandle(evt:cc.Event) {
        cc.log(evt.currentTarget); //node对象
        cc.log(fgui.GObject.cast(evt.currentTarget)); //gobject对象
    }
Mouse / touch events
For mouse events and touch events, FairyGUI uses custom events. The constants are defined in fgui.Event, which is different from Creator's own cc.Node.EventType.TOUCH_BEGIN. Please note the difference. Because Creator's own touch logic is difficult to handle penetration / non-penetration, and custom area clicks.
The mouse / touch event callback function has one parameter: evt: fgui.Event, fgui.Event inherits from cc.Event.
-
TOUCH_BEGINThe mouse button is pressed (left, middle, right), or the finger is pressed. Mouse buttons can be obtained from evt.button, 0-left button, 1-middle button, 2-right button. If it is a touch event, you can get the finger ID from evt.touchId; if it is a mouse event, evt.touchId is always 0. -
TOUCH_MOVEThe mouse pointer moves or your finger moves on the screen. This event will only be triggered in two cases. 1. evt.captureTouch () is called in TOUCH_BEGIN, then subsequent movement events will be triggered on this object (regardless of the position of the finger or pointer above the object). 2. TOUCH_MOVE on GRoot will always trigger, no need to use captureTouch to capture. -
TOUCH_ENDThe mouse button is released or your finger is off the screen. If the mouse or touch position is no longer within the range of the GObject, then the component's TouchEnd event will not be triggered. If it is really needed, you can call evt.captureTouch () in TOUCH_BEGIN to request capture. -
CLICKClick event. You can determine whether to click or double-click from evt.isDoubleClick. There is a shortcut for listening for click events: GObject.onClick (callback, ...), which is simpler than GObject.on (fgui.Event.CLICK, ...). -
ROLL_OVERFired when the mouse pointer or finger moves into the display object area. -
ROLL_OUTFired when the mouse pointer or finger moves out of the display object area. -
MOUSE_WHEELMouse scroll event.
If you are not in the event callback process and need to get the current mouse or finger position, you can use:
// touchId is the finger id, if you don't care about this, don't pass in
    let pos1: cc.Vec2 = fgui.GRoot.inst.getTouchPosition (touchId);
At any time, if you need to get the current clicked object, or the object under the mouse, you can get it in the following ways:
let obj: fgui.GObject = fgui.GRoot.inst.touchTarget;

    // determine if it is in a certain component
    cc.Log (testComponent.isAncestorOf (obj));
Font
If you want to use ttf fonts, these steps are needed:
-
You first need to get the cc.Font object. Whether you obtain this object from loadRes or directly in the scene through script variables, you can follow the project requirements.
-
Use fgui.UIConfig.registerFont to register a cc.Font with a font name used in FairyGUI. Assuming that aFont is the cc.Font object:
fgui.UIConfig.registerFont('myfont', aFont);
- If this is a global font:
fgui.UIConfig.defaultFont = 'myFont';
- If this is a font specified by a certain text, for example:
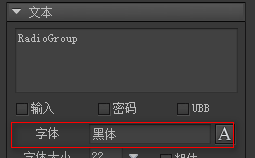
A font with the name "Heihe" is used here. This is a different font from UIConfig.defaultFont, so we need to register this font. which is:
fgui.UIConfig.registerFont ('Bold', aFont);